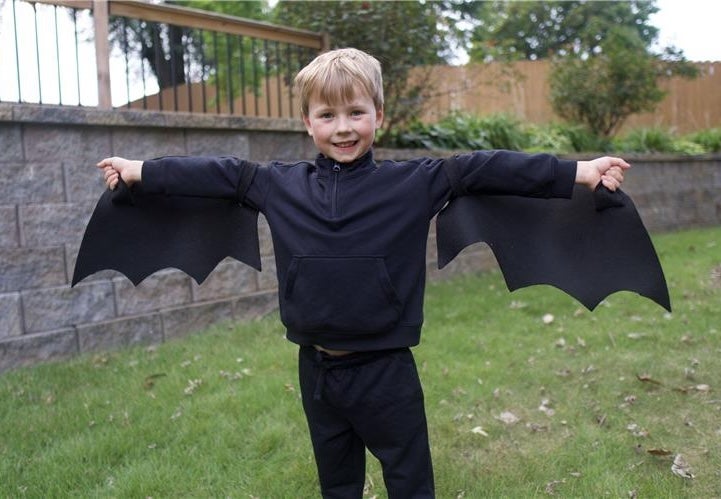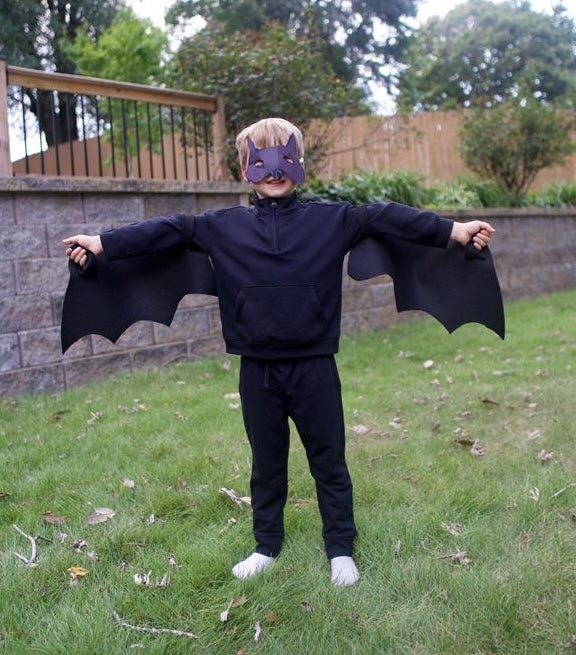
Halloween costumes don’t have to be complicated or expensive. And if you’re the last-minute parent (guilty!), this one’s definitely for you. No need to sew a thing, spend a ton of money or run around to five different stores. Just grab any basic black top and black bottom from Carter’s, plus a handful of craft supplies, and you’ll have yourself a bat costume that’s ready for trick-or-treating or school costume day in under an hour.
Here’s how to pull together a bat costume in one afternoon:
What you’ll need
- Long-sleeve black top (A pullover or short-sleeve tee are also great options, depending on your climate.)
- Black leggings or joggers (See note above – shorts work, too!)
- Black felt or fabric (for the wings + mask)
- Fabric or hot glue, or safety pins
- Scissors
- Black or white elastic (for the face mask)
- Optional: A headband (if you don’t want to make a full mask)
- Optional: Black cardboard (for the bat ears if you’re not making a mask)
- Optional: face paint or eyeliner
Step 1: Make the bat wings
1. Cut two matching wing shapes out of your black felt or fabric. To do so, measure (or eyeball!) your child’s wingspan and draw the bat wing pattern. The easiest way is to picture it as half circles with little scallops along the edge.
2. Cut out four, approximately 2-inch wide, strips of fabric. This will be how your child wears the wings and will also keep the clothes safe from any holes, residue, etc. Two of the strips should be long enough to wrap around your child’s bicep and then be secured to the wings. The other two strips can be slightly shorter – these will go around your child’s hands so they can control their wings.
Step 2: The base layer
1. Get your little bat-to-be dressed in their black top and bottom. This base layer will be the bat’s body. (Warning: It’ll be the comfiest costume they’ve ever worn, and they may never take it off.)

Step 3: Put the bat body together
1. Have your child stand with their arms out and wrap one of the two longer strips of fabric around their arm, a few inches below their shoulder. Attach (or glue) securely to the wing.
2. Take one of the two smaller strips of fabric and repeat the same step, only this time wrapping the fabric around your child’s hand and securing it above and below where the wing starts to curve down. This allows them to hold the fabric in their hand and move their wings around freely and easily.
3. Repeat steps 1 and 2 on the other wing.
(Note: If you’re short on time, safety pins will work just fine to secure the fabric strips to your wings! Or if you want a sturdier hold, fabric or hot glue – or throwing in a few stitches – will stand up to even the wildest little bats.)
Step 4: Make the bat face
Two ways to go about making your bat’s face:
Make a mask:
1. Draw a mask, roughly the size of your child’s face, with two pointy ears, a small circle for a nose and two fangs (optional). Cut the mask out of your black felt.
2. Place your mask over your child’s face and mark where the two eye holes should be. Cut out the eye holes.
3. Attach the elastic on either side of the mask using glue or pins.
Bat ears + face makeup:
1. Cut two triangles for ears out of black cardboard and glue them to the top of the headband.
2. You can also use face paint or eyeliner to draw on fangs and a bat nose, if you want!
That’s it – your bat costume is done in maybe 30 minutes, start to finish. And the best part is your little one will re-use their black Carter’s basics longggg after Halloween.


